Attend class to learn about how to set up your website in Dreamweaver. You will learn how to create divs, place images, create an interactive menu and more.
Today we will commence on your assessment for this class. You will need to design a website for a client to promote his work or services. See examples below as a result of an in-class brain storm:
Portfolio of a designer, web-designer, graphic designer, fashion designer, …
Portfolio of an artist or illustrator
Portfolio of a photographer
Website for a horse trainer
Website for a singer
Website for a humanitarian organisation, eg Doctors Without Borders
Website for a restaurant
Four Web Pages
You will need to create 4 web pages using Dreamweaver or a WYSIWYG (What you see is what you get) code editor. These are the pages for you to create:
Home Page
About us and Contact
Gallery or Portfolio of Work
Bookings or Purchase Requests
Step 1 – Brainstorm Ideas
Brainstorm ideas for a website (if portfolio for a photographer, what type of photographer, wedding, portrait, famous photographer, …)
Step 2 – Research Content
Go online and research what content you can find for your website. Use Creative Commons sites whenever possible:
Otherwise use Google and add Creative Commons to your search criteria.
Step 3 – Storyboard
Create a storyboard for the website. Before you can create the storyboard you will need to organise all the different elements. Please refer to the Storyboard Workshop from Tuesday:
Storyboarding for Web Designers
Webdesigners benefit from storyboarding. It helps organising content and ensures that every element is included in a logical place according to topic and site.
Create the website in Dreamweaver (or any other Code editor) using HTML, CSS and if necessary JavaScript or JQuery.
Your website needs to have a well-designed layout
Attend class to learn about how to set up your website in Dreamweaver. You will learn how to create divs, place images, create an interactive menu and more.
Design and Layout
Here are some important standards to consider for a convincing, well-communicated web page:
Make sure to play with the different values at this link Boxmodel in W3Schools TryEditor, eg change the padding, margin, border, content to actually see the difference that it makes. Spend at least 20-30 mins changing values around.
After entering the Adobe TV site (link above) you should see an icon with resources at the top of the window. Download these and install on your D-drive.
Note: You will not see resources unless you have sign up with Adobe TV (for free).
We will read through this task together please click on the link to download the file. Follow the in-class discussion and make sure that you understand each question or ask the teacher in the presentation!
We will commence Dreamweaver training. We will use the video tutorials provided on Adobe TV’s Webdesign Channel, but I would like you to open this online PDF to get you started: A Beginner’s Cookbook to Dreamweaver.
Note: Before you view ‘Defining a new Site’ create a folder with the name dw website and subfolder by the names: assets, CSS, images, notes, scripts and video.
Web accessibility is the requirement to create websites that can be accessed and understood by as many people as possible. You can relate it to the accessibility of a room in a university. Every student has to be able to access the room regardless of injury, disability or other hindering circumstances. A lot of schools had to build ramps to allow students in wheelchairs easier access to the facilities.
Web Standards
Accessibility has been integrated into the web standards. The web standards are decided on by the W3C (World Wide Web Consortium). Please click on this link now to visit the W3C: www.w3.org. Can you find the definition of accessibility? (>http://www.w3.org/WAI/intro/accessibility.php)
Please look up what impairments and disabilities are the focus of accessibility!
Browser Compatibility
Make sure to code your websites to W3C web standards to allow for the widest range of web browsers.
Contrast and Colour Blindness
Colour blindness is a common problem today with sources claiming that most people have levels of colour blindness. It affects mostly males, and it is excepted that about 10% of males have some form of colour blindness.
Web designers need to ensure that text and other interface elements can be read and understood by everyone. Here is some advice on the use of contrast:
Any time you use colour to convey information in an interface also use clear, secondary cues to support the information.
Use grey scale differentiation
Use graphics to support the information
Use text label associated with each colour
Spend 10 minutes to find websites that help with contrast and colour blindness. List 5 sites that help with contrast and 5 sites that help when designing for accessibility and colour blindness. Add your links to this post in form of a comment!
You add an image to your web page with this code in HTML: <img src=”smile.jpg” alt=”girl smiling”> or <img src=”\images\smile.jpg” alt=”girl smiling”>
If a visually impaired user is trying to access your web page they rely on screen reader software. Using the alt attribute allows all users to get an idea of the image regardless if they can view it or not.
What could be other reasons for users not to be able to view images?
Click on this W3Schools Link and access the TryIt-Editor. Read the code for inserting an image and try to rewrite it from memory adding a descriptive alt attribute.
I will walk around and look at your results.
Drop-down Menus
Drop-down menus are a smart way to navigate. Drop-down menus tend to look very attractive. Many successful websites avoid their use in total: eBay, Yahoo!, Amazon.
Drop-down menus are bad for accessibility.
HTML Code
Using the example of bold text and strong text, the code for bold <b>I love Football!</b> boldens that section. Using the code for strong has the same visual impact, but the difference is quite important. If you write <strong>I love Football!</strong> it will look bold, but a speech reader will interprete the text as important.
So, use strong rather than bold.
Self-closing HTML Tags
The old style of a tag is not self-closing: <br>. This is the tag for a line break and most browsers will have no trouble to read it. The web standard-compliant version is self-closing: <br />. Start to use self-closing tags to ensure that your websites will show on the widest range of web browsers in the future as well.
Site Maps
Site maps are a good way to support accessibility. Anyone with trouble navigating your site will benefit from a clear, text-based site map.
What is a site map? It is an index or guide to the different pages and hyperlinks on your website.
Make sure to use text size that is suitable for a variety of users. Smaller text looks neet and modern, but not everyone will be able to read small text (think of older users).
Recommendations regarding the ideal text size vary significantly: various sources recommend sizes for body text (main text) from 12px-14px as well 16px. W3Schools recommends a default size for paragraphs of 16px.
With a change towards responsive web design, a design approach that aims at flexible website dimensions to provide an optimal viewing experience on any platform, there has also been a shift towards maesuring text size in em, rem or in percentages.
Text set in em or rem (they are different) can be resized by all browsers, which allows for ideal viewing on a screen as much as on a tablet or mobile phone.
It is recommended to add a link that allows the user to change the font size within the website. To achieve this you need to include a link that uses JavaScript to swap between two CSS style sheets.
Accessibility Validation
It is important to check your website for accessibility! Make use of one of several online accessibility validators. Bobby used to be the most successful free online validator, which has been disabled recently by IBM.
Automated validators give only an indication of the accessibility of your website. Accessibility is measured at three levels from basic accessibility to advanced: A, AA, AAA. Each level relates to a priority checklist that can be found at: W3C website.
The W3C website is rather cumbersome and that is being friendly. It is fine to use an accessibility validator and you can refer to the checklist below (see Accessibility Checklist)
What level do you need to reach as a web developer? W3C states:
A Web content developer must satisfy all priority 1 points. This will give the site a Level A-Accessibility rating, which can be labeled on the website.
A Web content developer should satisfy all priority 2 points. This will give the site a Level AA-Accessibility rating, which can be labeled on the website.
A Web content developer may satisfy all priority 3 points. This will give the site a Level AAA-Accessibility rating, which can be labeled on the website.
Alternative Content for Flash
There has been a problem with Flash content online. Flash content has not been accessible until later versions of Adobe Flash. If you use Flash make sure to provide the content in alternative format.
It is recommended to describe your Flash file (SWF) in words by offering users a link to a text version.
Semantic Markup
The W3C has declared its intention to create a Semantic Web, meaning a World Wide Web of structured data, that is transparent. Using ‘Semantic Markup’ means that you will write HTML that is self-descriptive and written for other humans rather than just for machines (software, parsers, Google etc).
Semantic Markup means that HTML code is used appropriately. This is achieved by using the HTML standard classes accordingly: <h1> will be used for the main heading followed by <h2> and these tags will be used for headings and not to emphasise or enlargen text. <p> will be used for a paragraph (rather than <br /> for line break).
Above I mentioned the examples of using <strong> rather than <b> to emphasise text. The same applies to the <em> tag (which actually stands for emphasis, while strong represents prominent text) to be used rather than the <i> tag which stands for italic or sloped text.
The point is that <b> and <i> are purely representational or visual, while <strong> and <em> offer semantic meaning that will be interpreted differently by screen reader software. The other point is that the visual representation for <strong> and <em> may change over time from bold and italic to something else (eg high-lighted).
You can also add comments to important sections of your code. Comments will only display in your HTML code and not on your website. The use of comments is to help understand long passages of code. Other team members will benefit. But it also helps understanding code that you wrote a while ago.
Example of a comment in HTML: <!–This is a comment. Comments are not displayed in the browser–>
HTML5 offers new semantic elements to clearly define different parts of a web page:
<header>
<nav>
<section>
<article>
<aside>
<figcaption>
<figure>
<footer>
Example of Semantic HTML5 Tags, Source: W3Schools.com
Accessibility Checklist
Finally, here is a checklist that you may want to use.
Add valid DOCTYPE declaration
Keep the content simple, avoiding jargon and complex words
Avoid justified text, as users with dyslexia find it harder to read than left-aligned text
Use sans-serif (eg Verdana, Calibri, Arial)
Avoid images of text
Allow that font size can be adjusted
Allow for large clickable area of links
Use descriptive links (avoid ‘click here’) This is important for users with visual impairment who rely on screen reader software.
Provide a sitemap
Provide ‘Back to Top’ and ‘Skip’ links
Ensure functionality of keyboard and mouse (eg tab)
Use images and icons
Provide meaningful alternative text for images: <alt>
Provide enough contrast in your colours of text and background
Avoid distracting animations and sounds or allow for them to be paused, skipped or switched off
Make use of white space (empty space around filled space with either text or images)
Provide a consistent design and navigation throughout the website
(The checklist is an altered version based on the original that can be found in ‘How to Design Websites’ by Alan Pipes, Laurence King Publishing, 2011, p.73.)
Feedback
Please leave your feedback in form of a comment. Your feedback and suggestions will help me to make this blog more user friendly. Thanks!
The classes will be delivered in 3 hour schedules. The content will be posted on this blog as well as on MyKangan. Tasks, discussions and research will be conducted inside the 3 hour slot and at home.
You are expected to work towards goals independently and to be able to operate as part of a team. In a work place you will sometimes be lucky to work with people that you easily get along with, but unfortunately you might often have to work with people that you might not easily get along with. A professional looks beyond this and finds ways to function in a professional environment with a range of personalities.
Assessments:
Important: You need to submit all your assessments on MyKangan. It is your responsibility to follow up due dates and access to MyKangan.
Day 1 Task – this task is a simple comprehension task to establish student participation. (due: after the first class)
Assessment 1
Assessment 2
RAE – Research and Exploration or Class of Federico
This blog will be or main form of contact. It will be accessible from anywhere as long as you have internet access.
The web address is www.classoffederico.wordpress.com, and the name is RAE – Research and Exploration – Never Stop Learning. You might also call it Class of Federico or COF.
Make sure to leave comments on a regular basis. Any questions that you have can be posted as a comment. The posts for each class will be released prior to the class and in some cases the evening before.
MyKangan
To access MyKangan please open Kangan’s student portal and click on MyKangan. Next find the class by unit title. This can be a bit hard to see, so make sure to know the unit titles.
The unit title for this class will be combined in (the catchy name):
As you can see, the titles are long and hard to remember. The easiest is to look at the last segment with the unit code and title.
The unit itself will be structured in the same way, that you have classes listed as Week 1, Week 2, etc and assessments will be listed by title inside an assessment folder.
This is also where you will submit your assessments. You will find hyperlinks with names such as Submit Assessment 1 here.
You can send messages to your teacher and you can leave comments as well. I am always open to suggestions, so please feel free to forward ideas about content or software that you would like to cover.
Finding the Right Candidate for a Job… – Photo AdamRiley from www.projectnoah.org
Vertical lines of a dark fence, image courtesy of p.ic – Photo Internet Collection – www.photoic.wordpress.com, photographer: Federico Viola
Outlined text changed in size and colours dropped into the individual letters with Eyedropper tool using LMB + Alt
Setting the grid up.
The concept was used on the German side as well with this ‘Auch du sollst beitreten zur Reichswehr’ [You too should join the German Army], design by Julius Engelhard, Image: courtesy of mental_floss
The Glossy Reflection is transparent on top and gets whiter towards the bottom.
Only practice will help you learn! Photo by BreonWarwick on morgueFile
Good Morning! Photo: wallyir, from: morgueFile.com
Custom Shapes and Custom Shape Icon
Massive Attack – The Essential Mix
Using the Reflect tool (o) to reflect the i downwards as if it has collapsed in front.
A Beautiful Piece by Aerosol found on his Facebook
Photo by Seemann on morgueFile.com
He loves OHS! – Photo by Karpati Gabor on morgueFile
The Face by drfranken found on ChromoArt.de
Photo by agathabrown on morgueFile
Table of Content from Textbook – This design lends itself to an interactive use – found at: Smashing Magazine (click image for inspiring article on table of content design)
Text and Shapes – This design lends itself to an interactive use – found at: Klafferty.com
The gentle curve of the river and the light green tones of the grass give this image a calming feel. The montains and the clouds have a less calming effect. Image: courtesy of Icon Photography School – http://www.photographyicon.com/line/
From ‘Henri’s Walk to Paris’ 1962 – children’s book by Saul Bass Found at: Brainpickings.org
Pink Ribbon Day – Swiss International Style Reference – by Hwan Rochanabuddhi
Work by Jo W
Swiss travel poster from 1934 by Herbert Matter – Source: http://swisstype.wordpress.com/work/
Based on a photo by delboysafa from morgueFile.com
Milk Poster – Swiss International Style Reference – by Annabel Stephen Salip
Multimedia Production Cycle – This image is under the Creative Common Agreement, you can use it but will need to reference this site: www.classoffederico.wordpress.com
Leonardo’s St. John the Baptist, Louvre, Paris, Image: courtesy of A World History of Art – www.all-art.org
ruthworkx -http://ruthworkx.files.wordpress.com
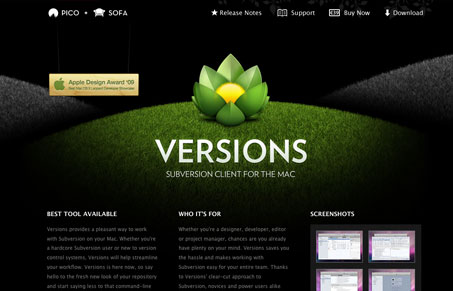
This is a template for a business website found at TemplateMonster. It is interesting in the sense that it breaks up the main image as part of the navigation. The sound it comes with is annoying.
Photo by matthewbridges on morgueFile.com
Fruity Design – This is great for a menu, very appetizing thumbnails – found at: WeddingPhotography.com
Courtesy of The Art of Mass Effect Universe’, 2012
Work by Justin Anderson
Illustration by Jessie Ford, found on DzineBlog.com
Example of applied changes
Couple found at http://frenchbydesign.blogspot.com.au
“Step into my office” Source: The Age, click image for link
The calming effect of horizontal lines, image: courtesy of flickr.com, Photographer: jaikdean
Vista Lighting Effect – Courtesy of: Tutorial9
Peace- Swiss International Style Reference – by Maryam Chananeh
Courtesy of The Art of Mass Effect Universe’, 2012
Study – Lines and Grace Kelly – by Federico Viola photo: courtesy of GettingCheeky.com and curved lines wallpaper: courtesy of FreeFever.com
Britons, Lord Kitchener Wants You! Propaganda poster design from WWI by Alfred Leere. Image: courtesy of WorldWarEra.com
Text and Shapes – This design lends itself to an interactive use – found at: Smashing Magazine (click image for inspiring article on table of content design)
Illustration: Jamie McKelvie – Art Brut Record
Typographic with Colours and Photos – The use of large numbers is effective and the low opacity of the boxes works, personally, I find it looks a bit dated- found at: JuxtaPost.com
Colours, Numbers and Boxes – very happy and alive, personally I do not like the distortion of the word content – found at: Flickr
‘For Great Road Trips: Switzerland’ Poster by Herbert Matter in (Swiss) International Style – Source: http://swisstype.wordpress.com/work/
Photo by omdur on morgueFile
Colourful Table of Content – Ribbons in Primary Colours – found at: LifeBlue.com
Based on photo by hotblack from morgueFile.com
What Time is it Now? by King_Bobbles
Lines and Gradients- Courtesy of: psdtuts+
Examples of Output and Display for web-content. Image: live.surveyshack.com
Swiss International Style – Joseph Müller-Brockmann – Beethoven – found at www.designhistory.com
Illustration by Jessie Ford, found on DzineBlog.com
Layers in Photoshop are like a Collage of images stuck on top of each other…
Image source: Data Center Knowledge
Illustration by Gary Neill found on P.A.P.-Blog – http://garyneill.com/ http://garyneill.tumblr.com/
Mosaic of Sofia Coppola – by Maurizio Galimberti – www.mauriziogalimberti.it
Photo by mcconnors on morgueFile
Illustration by Gary Neill found on Dzineblog.com – http://garyneill.com/ http://garyneill.tumblr.com/
Screenshot – 82 Everyone is a Marketer by Seth Godin from What’s Your Story by Joyce Hostyn
Photo Montage by SGlider12 on Webdesign.org – Click image for great Gimp tutorial
Uncle Sam Wants You, WWI Propaganda Poster for US Army recruits, Design by James Montgomery Flagg, 1916, image found at: Live Auctioneers
Close-up at Fed Square, Federico Viola 2013
Photo by ariadna on morgueFile
Based on photo by dhester from morgueFile.com
Photo by dharder on morgueFiles.com
The grass layer has been turned into a clipping mask with the shape of the rabbit below.
Poppies – Vector art Federico Viola based on photo by hotblack from morgueFile
Your Lipstick Needs You, an entertaining take by Digital Media Artist Samantha Cain. Courtesy of: Samantha Cain, http://www.behance.net/samanthacain
Italian movie poster found on Abduzeedo.com
Image from morgueFile by lemai13
Illustration by Kate Miller, found on DzineBlog.com
Illustration: Jamie McKelvie – Suburban Glamour Comic Series
Steel Curves, Image: courtesy of flickr.com, photographer: Margeois.
Photo by clarita on www.morguefile.com
Photo by clarita on morgueFile
Constructivism Reference – by Lylah Livingston
Light Streaks – Courtesy of: PhotoshopEssentials
Screenshot from What’s Your Story by Joyce Hostyn
Text-based Table of Content – Very Graphic and Black and White- found at: Smashing Magazine (click image for inspiring article on table of content design)
Based on photo by xandert found on morgueFile
Jenga, photo courtesy of: Design-Crit.com
The underlined text and insertion point at end of the word indicates that you are still in the type mode.
Screenshot of Endless Alphabet 2, courtesy of AppsPlayground.com
Based on image by hotblack on morgueFile.com – F.Viola
Illustrator unknown – found at: Ephemera – World of Rare Books
Some of us have there most enjoyable moments in nature at the beach, Photo by rivediamoci on morgueFiles
Found at Inc.com
Luminescent Lines – Courtesy of: PSDLearning
I Want You – Emily Strange, The lovable Emily Strange came to life in 1991, designed by Nathan Carrico for Santa Cruz Skateboards. She is referred to as a counterculture icon. I would just call her a sceptic. Image found at: Kollectable Kaos
Contemporary design in style of Construcitvism by Teo Brito found at LauraGreen92 – click image for more information and link to her blog


![The concept was used on the German side as well with this 'Auch du sollst beitreten zur Reichswehr' [You too should join the German Army], design by Julius Engelhard, Image: courtesy of mental_floss](https://classoffederico.files.wordpress.com/2014/04/world-war-propaganda_auch-du-sollst-beitreten.jpg?w=236&resize=236%2C301#038;h=301 "world war propaganda_Auch du sollst beitreten")


