Select a tutorial from below, complete it, add meta-data to the PSD file. Save as a JPEG and email a copy to me(with all relevant meta-data).
Lines in Photoshop
As we saw last week working with lines can be a lot of fun and create very dynamic results. Photoshop has many interesting options on using lines. Particularly the many effects that are part of Photoshop can lead to stunning results.
Luminescent Lines – this tutorial from a great Photoshop tutorial site – PSD Learning – looks at customising brush dynamics. Fun to do and an interesting start: use a photo to create a suprisingly abstract and attractive background. A good tutorial to try on your own.
Abstract Background – this is a more basic tutorial from YourPhotoshopGuide. It is good to introduce the Lens Flare filter and makes good use of the Free Transform and copy layer options.
Wavy Blackberry Style Wallpaper – this is a great tutorial from psdtuts+. It consists of 16 steps, but the result is convincing and you will learn a few good techniques on how to work with gradients and how to add depth to your work.
Lines and Gradients- Courtesy of: psdtuts+
Lines Tutorial – follow the in-class instructions to create an image like the one below. I basically used the Brush tool and drew straight lines. Next I multiplied layers (Ctrl+J) and changed the layer blending mode.
I added a photo, in the example a photo of Grace Kelly and masked selections.
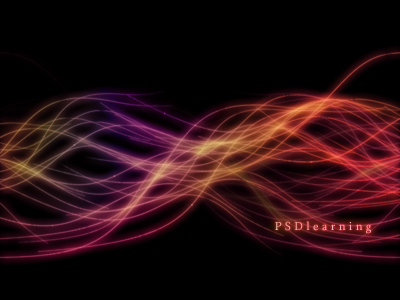
Study – Lines and Grace Kelly – by Federico Viola photo: courtesy of GettingCheeky.com and curved lines wallpaper: courtesy of FreeFever.com
We will look at lines today with fresh eyes (I hope). Line can be defined as having a starting point and an end point and the connection between the two is what the line actually is.
Lines are quite an amazing tool for many creators: when drawing the caricaturist uses lines to create his mean contortions to display a fatter, bolder, thinner, long nosed, big mouthed version of his subject. A writer uses lines to create text filled with meaning.
A graph shows the changes in the economy and an arrow points at something.
Lines can be a powerful tool of expression and we will start today’s class with a blank sheet of paper and a pencil.
Draw 5 lines to express 5 concepts, themes or emotions. Below are examples:
forgetfulness
playfulness
sadness
happiness
searching
excited
technology
nature
anything that you come up with …
About Lines
What is a line?
A line is a fundamental design and art element. We describe the world around us with line drawings. We draw the contour or outline of objects and shapes that we see around us to define them on a sheet of paper, a canvas or other 2D platform. This was already established by our forefathers who used the walls of caves as their canvas to depict the world around them.
Work by Egon Schiele, found at Mom.org
The illustration is by Viennese artist Egon Schiele (pronounced: Sheelah) and you notice how lines are used to display the outlines and expression of a man. The lines do not exist as such in life, a person does not have a contour line around them and their eyes are not two curved lines either.
So, lines are used as a form of expression. Lines are borrowed in drawings to create shapes and outlines.
The function of a line in design (and art) goes beyond that though.
First and foremost in an abstract sense a line is something that we perceive more than view. It gives us a sense of direction. In this sense lines seem to always have one or more directions.
The lines in the image above seem to move from left to right if you are of a culture that reads from left to right.
Characteristics
Lines can be looked at by characteristics:
Length
Weight (darkness/thickness)
Direction
Basic Applications
Lines can be looked at by their basic application:
Outline describes the outer boundary of a two-dimensional shape.
Contour is the use of line to define the edge of an object and emphasize the volume or mass of the form.
Gestural lines are quick marks that capture the impression of a pose or movement.
Implied lines are suggested or broken lines that are completed with your imagination through the concept of closure. An arrow is used to suggest a direction or path for the eye to follow.
Calligraphy is beautiful, expressive marks. An expressive stroke freely uses the characteristics of line to convey emotion to the viewer, much like an individual’s handwriting changes with different moods.
Analytical line is a formal use of line. Analytical line is closer to geometry with its use of precise and controlled marks. A grid is a very popular analytical use of visual line as a way to organize a design. The Golden Section is an example of the traditional use of analytical classical line, which uses calculated implied lines to bring unity to the structure of a painting composition.
Modeling line is used to create the illusion of volume in drawing. Hatching is the use of parallel lines to suggest value change. Parallel lines on another angle can be added to create cross-hatching to build up a gradation and more value in areas of a drawing.
Directional lines suggest movement or a path of vision and have specific connotations associated with them for example: Vertical lines suggest power and authority; horizontal lines suggest peace and tranquility. Together they give a feeling of calm and stability. Diagonal lines suggest tension; curved lines are graceful and fluid. Together they create a feeling of stress and movement. Linear perspective can be applied to drawing to create the illusion of depth on a two-dimensional surface. (Source: http://www.onlineartcenter.com/line.html)
Lines in Design
Look at the example below of lines in design from a Google search:
Lines Google Image Search
Click on the image above and save 5 -10 images to inspire you to create a Photoshop generated image that displays lines as a rhythmic component.
Before you save the file and email it to me, make sure to include the Meta Data.
Below is an example of a Photoshop generated study incorporating a portrait of the US-American actress Grace Kelly (image can be found at: GettingCheeky) with straight lines at different angles and a wallpaper found on FreeFever.com.
Study – Lines and Grace Kelly – by Federico Viola photo: courtesy of GettingCheeky.com and curved lines wallpaper: courtesy of FreeFever.comStudy – Lines and Grace Kelly – by Federico Viola photo: courtesy of GettingCheeky.com and curved lines wallpaper: courtesy of FreeFever.com
Feedback
Please leave your feedback in form of a comment. Your feedback and suggestions will help me to make this blog more user friendly. Thanks!
Note: while the last tutorial is based on CS4 – it is still useful for CS5 and CS6 users.
The next step is to apply the metadata to various images. Make sure to think about the Keywords before you choose them. They will be instrumental when web users are trying to access work through a Search Engine like Google or Yahoo!. Please do that now in class while I walk around and witness it.
Applying Metadata Templates
If you work with a number of images at once you will find it more useful to create a template. We will watch the next tutorial on Adobe TV and afterwards go through the steps together.
Use photoshop to create a photo montage image like the one below.
Search for specific technique: Photomontage
Artform that became extremely popular in the early 20th Century. Particularly popular in German Expressionism and Dadaism. Click the images for links to the original images or sites:
Photomontage: Amir Ebrahim Photography
Massive Attack – The Essential Mix
Create the Image in Photoshop
Create a similar photomontage to the one above by Amir Ebrahim Photography. Find a photo to base it on and copy and paste layers and change the image colour and tone.
Make sure to apply the meta data to the final product before saving it as a JPEG and PSD.
Email the JPEG
Email the JPEG to me.
Student Examples
Below are examples by students:
to be posted
Feedback
Please leave your feedback in form of a comment. Your feedback and suggestions will help me to make this blog more user friendly. Thanks!
Please read the text word by word and … no actually, let us move to greener pastures:
Applying Meta Tags
It would help to actually know what meta tag means:
A meta tag is basically a tag in HTML that describes the contents of a Web page.
We will look at different ways to apply meta data to files:
Applying meta data with Photoshop
Applying meta data with Adobe Bridge
Applying meta data with meta tags in HTML
Applying Meta Data in Photoshop
Question to the class: why do you think it is important to apply meta data in the first place?
Do not read any further…
We will apply meta data in Photoshop with File>File Info… or with the shortcut: Alt+Shift+Ctrl+I.
This opens a window and you will be able to enter information in there. Let us focus on a title, the name of the creator (you) a copyright statement, a description and keywords.
Creating a Poster in Photoshop
Before you can apply any data to a Photoshop document though, you need to have a Photoshop document. So, let us begin with some fun:
In 1:20h create a poster that is inspired by either Swiss International Style, Constructivism or the Vietnamese Propaganda Poster.
Feel free to use some of your own art work or appropriate imagery found online.
Make sure to apply the meta data to the final product before saving it as a JPEG and PSD.
E-mail the JPEG to me! 🙂
Inspirations for today’s task:
Swiss International Style – an iconic style of graphic design from the 1950s, strongly influenced by the ideals of the German Bauhaus – Click the image for a Google search on Swiss Style:
Swiss International Style
Constructivism – The immensely graphic art and propaganda style of Communist Russia, or to be more precise, of the Soviet Union. Early 1920s – 1940s. Click the image for a Google search on Constructivism:
Constructivism
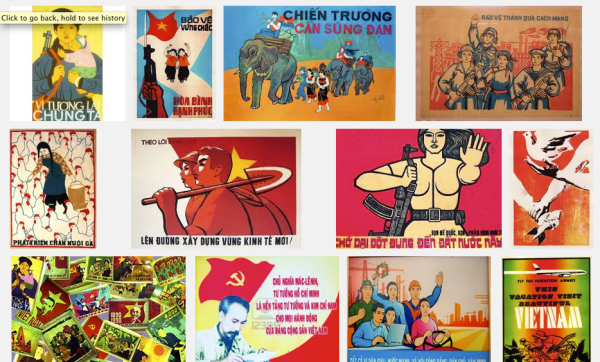
Vietnamese Propaganda Posters – this is a particular style popular in Communist Vietnam. Visually very flat with the use of rich patterns and stunning in colour scheme. I feel very attracted to this style. Vietnam particularly in 1960s and 1970s. Click the image for a Google search on Vietnamese Propaganda Poster:
Vietnamese Propaganda Poster
Feedback
Please leave your feedback in form of a comment. Your feedback and suggestions will help me to make this blog more user friendly. Thanks!
Student Examples
Below are examples by students:
Milk Poster – Swiss International Style Reference – by Annabel Stephen SalipConstructivism Reference – by Lylah LivingstonPink Ribbon Day – Swiss International Style Reference – by Hwan RochanabuddhiZig Zag – Swiss International Style Reference – by Nawras Shakeer
Peace- Swiss International Style Reference – by Maryam Chananeh
Pink Ribbon Day – Swiss International Style Reference – by Hwan Rochanabuddhi
Some of us have there most enjoyable moments in nature at the beach, Photo by rivediamoci on morgueFiles
Work by Justin Anderson
Custom Shapes and Custom Shape Icon
Found at Inc.com
Based on image by hotblack on morgueFile.com – F.Viola
The swirls in the image are made up of numerous lines. Courtesy of: www.openprocessing.org
Photo by omdur on morgueFile
Courtesy of The Art of Mass Effect Universe’, 2012
Vertical lines of a dark fence, image courtesy of p.ic – Photo Internet Collection – www.photoic.wordpress.com, photographer: Federico Viola
Example of applied changes
The calming effect of horizontal lines, image: courtesy of flickr.com, Photographer: jaikdean
Photo by mcconnors on morgueFile
Image from morgueFile by lemai13
Photo by hotblack on morgueFile.com
Image Source: www.photoshopessentials.com
Britons, Lord Kitchener Wants You! Propaganda poster design from WWI by Alfred Leere. Image: courtesy of WorldWarEra.com
Couple found at http://frenchbydesign.blogspot.com.au
Illustration: Jamie McKelvie – Suburban Glamour Comic Series
“Step into my office” Source: The Age, click image for link
Photo Montage by SGlider12 on Webdesign.org – Click image for great Gimp tutorial
Illustration: Tavis Coburn – Illustration for for an article predicting trends in Apple’s mobile strategy. Found on: TavisCoburn.com
Milk Poster – Swiss International Style Reference – by Annabel Stephen Salip
Photomontage: Amir Ebrahim Photography
Photo by matthewbridges on morgueFile.com
Based on photo by xandert found on morgueFile
Courtesy of The Art of Mass Effect Universe’, 2012
Based on photo by hotblack from morgueFile.com
Illustration by Tavis Coburn found on DzineBlog.com
ruthworkx -http://ruthworkx.files.wordpress.com
Illustration by Jessie Ford, found on DzineBlog.com
Study – Lines and Grace Kelly – by Federico Viola photo: courtesy of GettingCheeky.com and curved lines wallpaper: courtesy of FreeFever.com
I Want You – Emily Strange, The lovable Emily Strange came to life in 1991, designed by Nathan Carrico for Santa Cruz Skateboards. She is referred to as a counterculture icon. I would just call her a sceptic. Image found at: Kollectable Kaos
Jenga, photo courtesy of: Design-Crit.com
Peace- Swiss International Style Reference – by Maryam Chananeh
Illustrator unknown – found at: Ephemera – World of Rare Books
Vista Lighting Effect – Courtesy of: Tutorial9
Screenshot – 82 Everyone is a Marketer by Seth Godin from What’s Your Story by Joyce Hostyn
Screenshot from What’s Your Story by Joyce Hostyn
This is a template for a business website found at TemplateMonster. It is interesting in the sense that it breaks up the main image as part of the navigation. The sound it comes with is annoying.
Screenshot of Endless Alphabet 2, courtesy of AppsPlayground.com
Multimedia Production Cycle – This image is under the Creative Common Agreement, you can use it but will need to reference this site: www.classoffederico.wordpress.com
From ‘Henri’s Walk to Paris’ 1962 – children’s book by Saul Bass Found at: Brainpickings.org
The grass layer has been turned into a clipping mask with the shape of the rabbit below.
Photo by frenchbyte on morgueFile
Text and Shapes – This design lends itself to an interactive use – found at: Smashing Magazine (click image for inspiring article on table of content design)
Illustration by Gary Neill found on P.A.P.-Blog – http://garyneill.com/ http://garyneill.tumblr.com/
Michael Pointing in GTA V – Courtesy of Rockstar
Illustration by Kate Miller, found on DzineBlog.com
He loves OHS! – Photo by Karpati Gabor on morgueFile
Uncle Sam Wants You, WWI Propaganda Poster for US Army recruits, Design by James Montgomery Flagg, 1916, image found at: Live Auctioneers
The gentle curve of the river and the light green tones of the grass give this image a calming feel. The montains and the clouds have a less calming effect. Image: courtesy of Icon Photography School – http://www.photographyicon.com/line/
Poppies – Vector art Federico Viola based on photo by hotblack from morgueFile
Steel Curves, Image: courtesy of flickr.com, photographer: Margeois.
Illustration by Gary Neill found on Dzineblog.com – http://garyneill.com/ http://garyneill.tumblr.com/
Image source: Data Center Knowledge
Leonardo’s St. John the Baptist, Louvre, Paris, Image: courtesy of A World History of Art – www.all-art.org
The concept was used on the German side as well with this ‘Auch du sollst beitreten zur Reichswehr’ [You too should join the German Army], design by Julius Engelhard, Image: courtesy of mental_floss
Concept for Gallery Screnshot
Italian movie poster found on Abduzeedo.com
Fruity Design – This is great for a menu, very appetizing thumbnails – found at: WeddingPhotography.com
Only practice will help you learn! Photo by BreonWarwick on morgueFile
Contemporary design in style of Construcitvism by Teo Brito found at LauraGreen92 – click image for more information and link to her blog
Table of Content from Textbook – This design lends itself to an interactive use – found at: Smashing Magazine (click image for inspiring article on table of content design)
‘For Great Road Trips: Switzerland’ Poster by Herbert Matter in (Swiss) International Style – Source: http://swisstype.wordpress.com/work/
Free Transform and Ctrl – I am loving it!!!
Photo by dharder on morgueFiles.com
Based on a photo by delboysafa from morgueFile.com
Close-up at Fed Square, Federico Viola 2013
Colourful Table of Content – Ribbons in Primary Colours – found at: LifeBlue.com
The underlined text and insertion point at end of the word indicates that you are still in the type mode.
The Face by drfranken found on ChromoArt.de
Grassy Rabbits
Text and Shapes – This design lends itself to an interactive use – found at: Klafferty.com
Illustration by Jessie Ford, found on DzineBlog.com
Light Streaks – Courtesy of: PhotoshopEssentials
What Time is it Now? by King_Bobbles
Mosaic of Sofia Coppola – by Maurizio Galimberti – www.mauriziogalimberti.it
Good Morning! Photo: wallyir, from: morgueFile.com
Colours, Numbers and Boxes – very happy and alive, personally I do not like the distortion of the word content – found at: Flickr
Outlined text changed in size and colours dropped into the individual letters with Eyedropper tool using LMB + Alt
Using the Reflect tool (o) to reflect the i downwards as if it has collapsed in front.
Lines and Gradients- Courtesy of: psdtuts+
Swiss travel poster from 1934 by Herbert Matter – Source: http://swisstype.wordpress.com/work/
Photo by agathabrown on morgueFile
Photo by ariadna on morgueFile
Photo by Seemann on morgueFile.com
From ‘Henri’s Walk to Paris’ 1962 – children’s book by Saul Bass Found at: Brainpickings.org
Work by Jo W
Your Lipstick Needs You, an entertaining take by Digital Media Artist Samantha Cain. Courtesy of: Samantha Cain, http://www.behance.net/samanthacain
The Glossy Reflection is transparent on top and gets whiter towards the bottom.
Swiss International Style – Joseph Müller-Brockmann – Beethoven – found at www.designhistory.com
Photo by mconnors on morgueFile
Source: morgueFile, Photo by matei
Based on photo by dhester from morgueFile.com
Photo by clarita on morgueFile
Typographic with Colours and Photos – The use of large numbers is effective and the low opacity of the boxes works, personally, I find it looks a bit dated- found at: JuxtaPost.com
Photo by DTL on morgueFiles
Layers in Photoshop are like a Collage of images stuck on top of each other…
Finding the Right Candidate for a Job… – Photo AdamRiley from www.projectnoah.org
Photo by clarita on www.morguefile.com
Constructivism Reference – by Lylah Livingston
Examples of Output and Display for web-content. Image: live.surveyshack.com
Illustration: Jamie McKelvie – Art Brut Record
Study – Lines and Grace Kelly – by Federico Viola photo: courtesy of GettingCheeky.com and curved lines wallpaper: courtesy of FreeFever.com
Massive Attack – The Essential Mix
Geese in Ameland, Photo by Frans Schouwenburg
Experimental Photomontage by Robert Heinecken
A Beautiful Piece by Aerosol found on his Facebook
Text-based Table of Content – Very Graphic and Black and White- found at: Smashing Magazine (click image for inspiring article on table of content design)


![The concept was used on the German side as well with this 'Auch du sollst beitreten zur Reichswehr' [You too should join the German Army], design by Julius Engelhard, Image: courtesy of mental_floss](https://classoffederico.files.wordpress.com/2014/04/world-war-propaganda_auch-du-sollst-beitreten.jpg?w=364&resize=364%2C464#038;h=464 "world war propaganda_Auch du sollst beitreten")


